
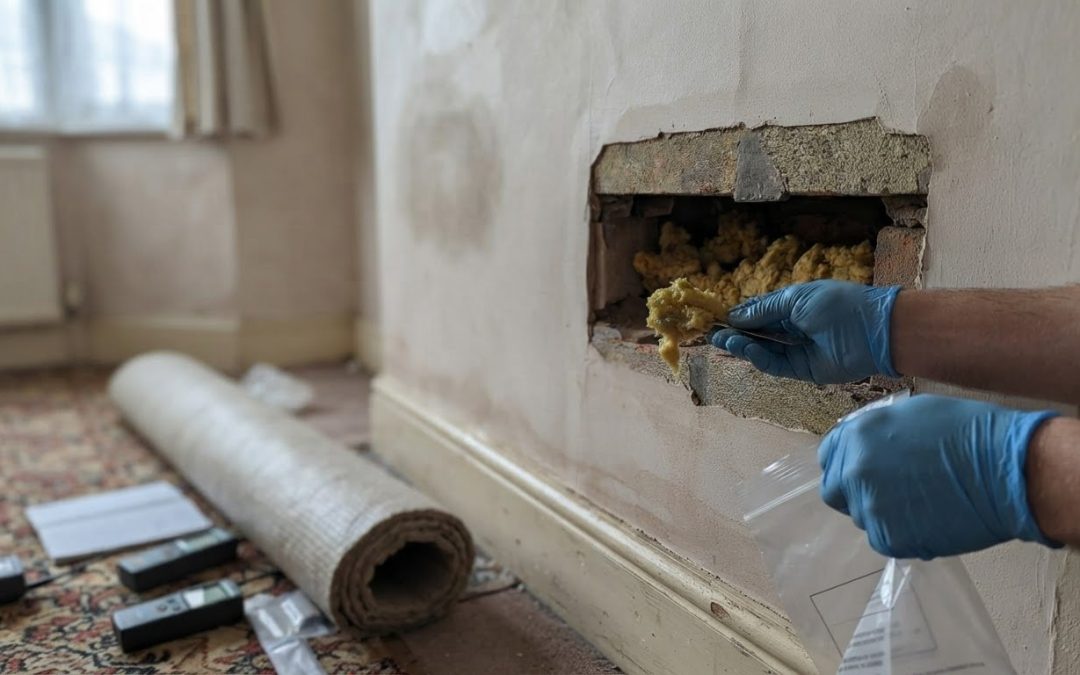
Rising damp often leaves a tide mark low on a wall. Damp higher up, or on an external-facing wall that worsens after rain, may point to wet cavity insulation. Telling rising damp vs wet cavity insulation apart depends on the pattern, location and timing of the moisture, not just the appearance of a patch.
It’s understandable to worry when walls feel damp or rooms suddenly seem colder. These signs can have several causes, so treating the visible patch without identifying how moisture is getting in may not resolve the underlying problem.
This guide explains the clues that help distinguish rising damp from moisture associated with cavity wall insulation, and the building defects or installation issues that may be involved. It also covers how inspections assess the cavity and when repairs to the building fabric, drying or cavity wall insulation removal may be appropriate.
Key Takeaways
- Use the location and timing of damp patches to help distinguish moisture rising from the ground from water entering through the cavity.
- Rain-related damp, colder rooms and wall patches above skirting level can point to insulation or cavity problems that need investigation.
- Defects in brickwork, blocked drainage openings and poor airflow can contribute to moisture, so the surrounding wall and ventilation matter too.
- Moisture profiling and cavity inspections can help identify the source before repairs are chosen.
- Where insulation is defective, cavity wall insulation removal and, where needed, wall tie surveys or replacement can form part of the remedial approach.
What to do if Cavity Wall Insulation Fails?
Start by considering how moisture may be reaching the wall, rather than treating the visible patch alone. The damp’s position, its relationship to rainfall and the condition of the external masonry can help guide an investigation.
Moisture Management in Cavity Walls
A cavity wall has a space between its outer and inner leaves, which helps manage rainwater, while insulation reduces heat transfer. Water reaching the outer brickwork should drain downwards rather than cross to internal surfaces. Defects, debris or insulation bridging the gap can interrupt drainage and allow moisture to affect internal walls. Both the wall’s condition and its construction inform the diagnosis.
Identifying Damp and Other Wall Moisture
The location and timing of damp can help distinguish possible causes, although a stain alone cannot confirm one. Rising damp commonly affects lower masonry, while moisture entering through a cavity may appear higher on an external-facing wall. Condensation or a leak can also cause damp patches. Treating plaster before identifying the source risks leaving the moisture route active and the damage likely to return.
Moisture Transfer Through Wet Insulation
Wet cavity insulation can bridge the gap between the outer and inner walls, creating a route for moisture. Saturated material may also insulate less effectively, making affected rooms feel colder. Cavity wall insulation may contribute to damp if defects or installation problems let water enter and cross the cavity. These signs warrant investigation, not an assumption that the insulation is always responsible.
An external inspection can help connect indoor symptoms with possible entry points. For example, cracked pointing or damaged brickwork near a rain-related damp patch may need repair to limit water ingress. Repairing the masonry without considering other cavity conditions may leave moisture pathways unresolved, so assess the surrounding wall and drainage together.
Moisture profiling compares readings at different heights and locations. Readings concentrated near the skirting can suggest a different pattern from higher readings across a wall. Alongside an external inspection, this helps assess whether the pattern fits rising damp or moisture entering through the cavity. If findings point to a cavity issue, further investigation can examine insulation, debris or voids.
Building defects and installation faults that can cause wet insulation
Wet cavity wall insulation may result from defects that let rainwater cross the cavity. Gaps in external brickwork, failed pointing or damaged seals around openings can provide entry routes. Installation faults can also matter: uneven filling, voids, overfilling or rubble in the cavity may obstruct drainage and create paths towards the inner wall.
Wind-driven rain puts exposed walls under greater moisture pressure, particularly where brickwork is cracked or joints have deteriorated. Coastal and other highly exposed properties can face severe rain exposure, making the condition of the outer leaf important. If damp patches appear or worsen after rainfall, inspect the corresponding external wall for damaged mortar, cracks, blocked drainage openings or water entry around windows.
A cavity wall’s position and condition can make it more vulnerable, regardless of age. Homes exposed to wind-driven rain, or with defects that let water into the cavity, warrant closer investigation. A cavity containing debris or poorly distributed insulation may not drain as intended. The combination of exposure and a route through the wall matters more than either factor alone.
Rising damp has a different pattern and source. Ground moisture can move upwards through porous masonry, especially where the damp-proof course is absent, damaged or bridged. Tide-mark staining commonly appears up to a metre above the skirting board, sometimes with peeling paint, salts or damaged plaster. Damp higher on an external-facing wall, especially when it tracks rainfall, points to other possible sources that need checking.
Treating rising damp starts with identifying why moisture is moving through the masonry, then addressing that cause and repairing affected finishes when the wall is ready.
To distinguish these patterns, compare the position of internal damp with external defects and ground-level features. For example, staining near the skirting with a tide mark differs from a mid-wall patch below cracked pointing. Treating plaster before finding the moisture route can leave the source active, allowing damage to return and repairs to need repeating.
A targeted cavity wall assessment can help relate visible defects to moisture within the wall. This is especially useful where rainfall patterns, masonry damage and damp locations suggest more than one possible route.
Checking ventilation, weep holes and cavity drainage
In a functioning cavity wall, rainwater that reaches the outer brickwork can drain down the cavity and escape through openings at the base. These openings help stop water collecting beside insulation or reaching the inner wall. If blocked, they can leave moisture trapped in the cavity and contribute to damp.
Inspect the base of the external wall for visible weep holes and obstructions such as mortar, paint or debris. Drainage weep holes should be formed at centres not exceeding one metre. A missing, blocked or poorly positioned opening can disrupt drainage, especially if water is entering through damaged brickwork or joints.
Consider the ground and external wall together. Raised paths, soil or paving may cover the lower brick courses or obscure drainage openings. Cracked mortar and damaged bricks can also let rainwater into the outer leaf. Note where these defects sit in relation to internal damp patches, so the pattern can guide further investigation rather than prompting an assumption that insulation is responsible.
Airflow matters too. Condensation can resemble damp linked to cavity wall insulation, so assess ventilation before attributing moisture to the cavity. For example, persistent moisture on a cold internal surface in a poorly ventilated room may indicate condensation. Check whether extractor fans work and vents are unobstructed, then compare these conditions with the location of wall staining.
Mineral-wool insulation is commonly blown into cavity walls through small holes in the external brickwork. An external visual check cannot show whether the material is wet or blocking drainage inside the cavity. If visible defects and damp patterns point to a cavity problem, a specialist inspection can examine the space and assess whether debris, insulation or water is affecting drainage.
- Note which weep holes appear blocked or covered.
- Look for damaged mortar, cracked bricks and surfaces obscuring the wall base.
- Compare external defects with the position of indoor damp.
- Check room ventilation and airflow before concluding that cavity insulation is the cause.
These checks help distinguish a drainage fault from condensation or another moisture source. If damp persists despite clear openings and adequate airflow, further cavity investigation can establish whether insulation or hidden debris is preventing water from draining properly.

Damp symptoms associated with wet cavity insulation
Wet cavity insulation may be indicated by a combination of internal dampness and changes in room temperature. A patch on an external-facing wall that worsens after rainfall is a useful clue, particularly if it is above skirting level. This pattern suggests moisture may be entering through the outer wall and crossing the cavity.
Look beyond the stain itself. Peeling paint, blistering wallpaper, damaged plaster or recurring mould around a patch can indicate persistent moisture. These signs do not identify the source alone, but their position helps guide an investigation. For example, damp beneath a window may relate to water entering around the opening, while a broader mid-wall patch may warrant a cavity check.
Rooms can also feel colder when insulation becomes saturated and insulates less effectively. If one external-facing room suddenly feels colder than neighbouring rooms, compare the affected wall with the room’s other surfaces. Coldness alone does not prove the insulation is wet, but it matters more alongside rain-linked dampness or visible deterioration on the same wall.
Cracks in brickwork or open mortar joints can provide routes for penetrating rain. Check whether indoor damp appears near the corresponding external defect and becomes more noticeable after wet weather. A matching location and rainfall pattern are stronger clues than a stain viewed in isolation. Water can also enter around window frames or at damaged wall junctions.
Other moisture problems can look similar. Condensation may appear on cold surfaces in a poorly ventilated room, while a plumbing leak can create a localised patch unrelated to rainfall. Rising damp more often affects the lower wall and may leave a tide mark. Comparing the height, shape and timing of symptoms helps distinguish these possibilities.
Keep a simple record of affected rooms, wall positions and weather conditions. Note whether a patch changes after rainfall, sits low or mid-wall, and whether the room feels colder. These details can help an inspection focus on the likely moisture route rather than treating surface damage first.
Moisture readings at different heights can add useful evidence. A reading concentrated near the floor differs from higher readings across an external wall. A cavity inspection can then assess whether wet insulation, debris or another obstruction is contributing. Together, symptom patterns and inspection findings help distinguish insulation-related damp from condensation, leaks or rising moisture.
Repairs and cavity wall insulation removal
Repairs should address the moisture route before damaged plaster or decoration is renewed. If cracked pointing lets rain into the outer leaf, repair the masonry defect first. If a blocked weep hole traps water, restore drainage. Removing insulation alone will not stop water entering through defective brickwork, so diagnosis should guide the order of work.
A cavity inspection can establish whether insulation is wet, contaminated, unevenly distributed or obstructing the drainage space. A borescope camera can inspect inside the cavity, while thermal imaging may help identify cold or damp areas behind plaster. These checks provide context: thermal patterns alone do not establish why moisture is present or whether the filling needs removal.
Where insulation is saturated or contaminated, specialist cavity wall insulation removal equipment can remove it from the cavity, but only after a professional survey confirms the need. The appropriate extent of removal depends on the inspection findings, including the affected areas and any debris or voids. For example, if water has caused insulation to sag, simply waiting for it to dry may not restore its original distribution.
- Identify the moisture route: relate internal damp to external cracks, open joints or drainage problems.
- Repair the defect: address the source of water entry before renewing internal finishes.
- Assess the cavity: check the condition and distribution of the filling, plus any debris or obstruction.
- Decide on clearance: remove problematic insulation where inspection shows it is saturated or contaminated.
Once the building fabric is repaired, the cavity may need time to dry. In some cases, insulation may remain after repairs and drying, but saturated or contaminated material needs a different assessment. Do not treat a cold patch or damp mark as sufficient evidence by itself. Findings should connect the wall’s condition with the proposed repair.
After cavity clearance, the underlying defects still matter. Damaged brickwork, blocked drainage or faulty detailing can allow moisture to return if left unresolved. A sound repair plan links the condition of the cavity, external masonry and affected internal finishes, rather than focusing only on the visible stain.
If damp symptoms point to wet or defective cavity filling, arrange a specialist assessment and discuss cavity wall insulation removal where inspection supports it. This keeps the decision focused on the actual cavity condition and the repairs needed to protect the wall.
CavClear
CavClear helps property owners investigate whether damp relates to cavity wall insulation, masonry defects or failing wall ties. Its Cavity Wall Insulation Surveys assess the wall system and provide findings with recommended remedial solutions. This gives you a clearer basis for deciding what needs attention, rather than assuming every damp patch has the same cause.
If an inspection identifies defective or incorrectly installed insulation contributing to moisture problems, Cavity Wall Insulation Removal can address material within the cavity. The findings matter too: if external defects are letting water in, those need consideration alongside the insulation. A cavity assessment helps connect the observed damp with conditions inside the wall.
Not every moisture issue points to insulation. CavClear’s Cavity Wall Insulation Surveys can help investigate the cavity, while external signs such as cracking or damp patterns provide important context. A clear report distinguishes observations from recommended remedial work, so the next steps relate to the specific property rather than a general assumption.
Wall ties are another part of cavity wall condition. Corroded or failing ties can contribute to cracking or structural movement in masonry. A Wall Tie Survey can assess whether tie failure is a concern, and Wall Tie Replacement is available where remedial work is recommended. This is relevant when cracking appears alongside damp or other signs of wall movement.
These services address different findings but can inform the same overall assessment. For example, a survey may identify insulation problems, damaged cavity conditions or failing ties as separate issues requiring distinct remedies. CavClear provides Cavity Wall Insulation Removal, Cavity Wall Insulation Surveys, Wall Tie Surveys and Wall Tie Replacement according to the problem identified.
If damp returns after surface repairs, appears after rainfall or coincides with masonry cracking, a specialist cavity assessment can help clarify the cause. CavClear supports homeowners, buyers and property professionals across the UK with cavity-wall inspections and remedial recommendations. The aim is to identify the relevant fault and explain suitable next steps clearly.
Contact CavClear to discuss your damp symptoms or arrange an assessment of your cavity walls.
Choose a clear next step for your property
Before arranging cosmetic repairs, focus on establishing the moisture source. The distinction in rising damp vs wet cavity insulation can shape which areas need attention, so do not treat the visible mark alone. A clear diagnosis gives you a sound basis for planning the next step.
Consider how the symptoms relate to the property as a whole. Understanding rising damp vs wet cavity insulation means looking beyond one patch to consider the wall’s construction, condition and moisture pattern. Share these observations during an assessment to help focus the investigation and guide suitable remedial recommendations.
If you’re concerned about moisture in your cavity walls, contact CavClear about wet cavity insulation. CavClear offers cavity wall insulation removal, wall tie surveys and wall tie replacement where they fit the findings. A considered assessment can help you move forward with greater confidence and protect your property’s long-term condition.
Frequently Asked Questions
What is rising damp and what causes it in UK homes?
Rising damp is moisture that moves upwards through porous masonry from the ground. It can occur where a damp-proof course is missing, damaged or bridged by raised ground or another material. In a UK home, persistent low-level dampness may also relate to plumbing leaks or condensation, so assess the source before treatment. An inspection should consider the wall’s construction and moisture pattern, rather than relying on one mark.
What is wet cavity wall insulation and what causes it?
Wet cavity wall insulation is insulation in the wall gap that has become saturated with water. Rain entering through damaged brickwork or poor cavity drainage may contribute, as can installation faults that obstruct drainage or create moisture paths. A damp internal surface does not confirm that the insulation itself is wet. A cavity inspection, including a borescope examination, can help establish the material’s condition and whether it is contributing to the problem.
How can you tell rising damp from wet cavity insulation problems?
To distinguish rising damp vs wet cavity insulation, compare where damp appears with the wall’s condition and the timing of symptoms. Rising damp generally affects lower masonry, while insulation-related moisture may affect higher areas of an external wall. Note whether the patch changes after wet weather or appears in several rooms. These clues guide investigation, but inspection findings should inform the choice of remedial work.
What tests diagnose rising damp versus damp cavity wall insulation?
Moisture profiling compares readings at different heights and across affected areas, helping reveal how moisture is distributed. For rising damp vs wet cavity insulation, a borescope camera can inspect the cavity for wet insulation or obstructions. Thermal imaging may show cold areas behind plaster, but cannot identify the moisture source by itself. Combining results with an external inspection helps relate internal readings to wall defects and cavity conditions.
What UK standards or regulations apply to cavity wall insulation and damp diagnosis?
The article names PAS 2035 and PAS 2030 for retrofit and cavity wall insulation installation. Damp diagnosis can use external inspection, moisture profiling and cavity inspection; no specific damp-diagnosis regulation is given.
Which UK building types and locations are most at risk of wet cavity insulation?
Cavity walls are common in UK properties built between 1930 and 1990, but age alone is not the key risk. Homes exposed to wind-driven rain, especially coastal or other highly exposed locations, are more vulnerable when brickwork, pointing or drainage is defective, or insulation is poorly installed.
Recent Comments