
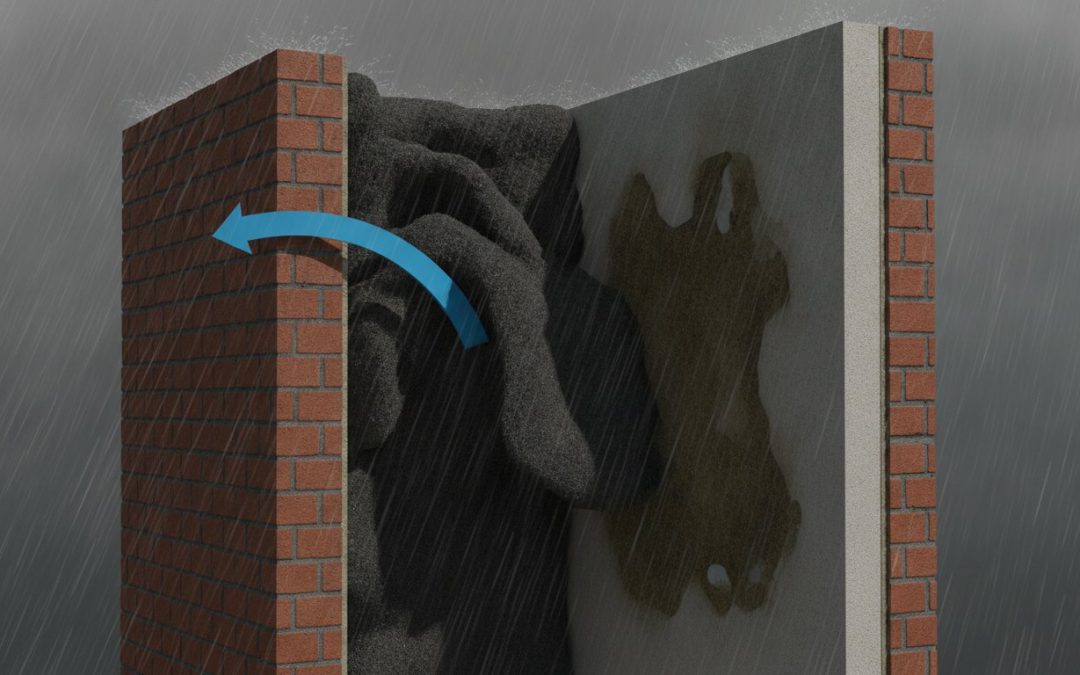
What if the very insulation meant to keep your home warm is actually the reason your walls are soaking wet? It’s a frustrating reality for many UK homeowners who find that penetrating damp through cavity wall structures is turning their living space into a cold, uncomfortable environment. You might notice recurring black mould growth or internal walls that feel damp to the touch, despite your best efforts to heat the property. When the gap between your brickwork is no longer a clear defensive void, moisture finds a direct path into your home.
We understand that dealing with persistent moisture is deeply stressful, especially when you worry about structural timber decay or the high heating bills caused by saturated insulation. This guide will show you exactly why your cavity walls are failing to block moisture and introduce the professional methodology used to achieve a permanent resolution. We’ll examine the technical causes of bridge-induced damp, the risks of leaving it untreated, and the specialist extraction and wall tie repair processes that restore your property’s structural integrity. You’ll learn how to transform a damp house back into a dry, healthy asset without the need for recurring maintenance.
Key Takeaways
- Understand the original engineering of your home’s cavity, which was designed as a 50mm air gap to effectively break capillary action and prevent moisture transfer.
- Learn how saturated or slumped insulation acts as a physical bridge, leading to penetrating damp through cavity wall structures during periods of heavy weather.
- Identify the specific warning signs of a compromised cavity, such as localised damp patches and musty odours that worsen after wind-driven rain.
- Discover why surface-level treatments like masonry creams often fail because they trap existing moisture inside the wall rather than removing the internal bridge.
- Explore the professional methodology for specialist cavity extraction and how restoring the clear air gap provides a permanent solution for long-term property health.
What is Penetrating Damp Through Cavity Walls?
Penetrating damp through cavity wall construction is a specific structural failure where moisture bypasses a property’s primary moisture defence. In a standard UK build, the external masonry leaf acts as a sacrificial weather shield; it is designed to absorb rain and allow it to evaporate naturally. However, when the internal air gap is compromised, water finds a physical path to the internal leaf. This process transforms a functional structure into a source of persistent dampness and internal decay. To understand the broader context of these issues, it helps to define What is structural damp? and how it differs from atmospheric problems like condensation.
It is vital to distinguish penetrating damp from other common moisture issues. Rising damp moves vertically from the ground through capillary action in the masonry. Condensation is an internal atmospheric issue caused by poor ventilation and temperature fluctuations. In contrast, penetrating damp is strictly an external ingress problem. It occurs when external moisture is allowed to bridge the cavity, often exacerbated by the very materials intended to improve the home’s energy efficiency. Identifying the correct cause is the first step toward a permanent, professional resolution.
The Physics of the Cavity Bridge
A clear cavity is a simple but highly effective engineering solution. It provides a complete air break that prevents water from moving horizontally from the outer wall to the inner wall. For a deeper look at this design, you can read our guide on What is a Cavity Wall? and its role in property health. When this 50mm+ void is filled with insulation or construction debris, the air break is lost. Capillary action then allows water to “wick” through the solid material. This creates a “bridge” that enables moisture to soak through to your internal plasterwork and timber frames.
Why Cavity Walls Fail in the UK
Modern UK weather patterns are placing unprecedented stress on traditional masonry. Increased frequency of wind-driven rain, particularly in coastal or upland regions, means external walls remain saturated for longer periods. If mortar joints have failed or the bricks have become porous over time, the volume of water entering the cavity increases significantly. In these conditions, any material bridging the void acts as a direct conduit for liquid water. This leads to the cold, damp-to-the-touch internal walls that many homeowners across the country now experience. As a nationwide specialist, we frequently see how these environmental factors combine with compromised cavities to degrade property value and comfort.
How Cavity Wall Insulation Acts as a Bridge for Moisture
Penetrating damp through cavity wall structures often begins when the internal void is filled with materials that absorb moisture. While a clear cavity provides a necessary break in capillary action, mineral wool or foam can act like a sponge. Once the external leaf becomes saturated by rain, the insulation “wicks” this liquid across to the internal leaf. This process is particularly aggressive in high-exposure UK regions where wind-driven rain is frequent and sustained.
Professional bodies often warn about the dangers of Blocked cavities and damp, noting that any obstruction can compromise the building’s envelope. When insulation slumps or is installed unevenly, it creates dense pockets where water collects. These wet zones create “thermal bridges” where heat escapes rapidly, making the internal wall surface significantly colder than the surrounding masonry. This temperature drop leads to localized condensation, which homeowners often mistake for a simple ventilation problem when the root cause is actually structural.
Saturated insulation loses its thermal properties entirely, effectively acting as a conductor that pulls heat out of the home rather than retaining it.
The Problem with Retrospective Insulation
Filling a void originally designed for ventilation is fundamentally risky. Retrospective installations often fail because they don’t account for the property’s specific exposure or the condition of the external masonry. By trapping moisture against the inner leaf, these materials create the perfect environment for black mould to thrive. This isn’t just a cosmetic issue; it’s a sign of a structural failure that requires a specialist cavity wall survey to diagnose correctly.
Wall Ties and Debris: The Hidden Conduits
Beyond the insulation itself, structural components can facilitate moisture transfer. Mortar “snots” or debris resting on wall ties provide a narrow but effective path for water to track across the cavity. When insulation is present, it holds this moisture against the steel ties for prolonged periods. This creates a destructive cycle: the wet environment accelerates wall tie corrosion, which leads to expansion and cracking of the mortar joints. These cracks then allow even more water ingress, further saturating the internal insulation.
Addressing these hidden conduits is essential for long-term stability. If you suspect your wall ties are compromised by moisture, consulting a Wall Tie Replacement Guide can help you understand the necessary remedial steps to preserve your property’s structural integrity and prevent further penetrating damp through cavity wall systems.
Identifying the Warning Signs of Cavity-Related Dampness
Recognising the early indicators of penetrating damp through cavity wall structures is essential for preventing long-term structural decay. Unlike internal condensation, which often appears uniformly across cold surfaces, cavity-related dampness typically presents as localised, irregular patches. These symptoms often fluctuate in severity based on local weather conditions. If you notice that internal dampness worsens significantly after periods of wind-driven rain, it’s likely the cavity is acting as a moisture bridge.
Internal Symptoms of a Bridged Cavity
The interior of a property often provides the most immediate evidence of a compromised cavity. Homeowners should look for specific markers that indicate liquid water is crossing the void. A common sign is the presence of hygroscopic salt streaks on internal decorations. These white, powdery deposits occur when moisture leaches minerals from the masonry; as the water evaporates, it leaves behind a visible “tide mark” that remains even during drier spells. This process is documented in scientific analysis of moisture in wall cavities, which highlights how moisture accumulation leads to material degradation.
- Localized Cold Spots: Use your hand to feel the wall surface. Areas where insulation has slumped or become saturated will feel significantly chillier than the surrounding wall because wet material conducts heat away from the room.
- The ‘Tap Test’: Gently tap on areas with visible dampness. A hollow, drum-like sound indicates that the plaster has “blown” or detached from the masonry leaf due to persistent moisture.
- Black Mould and Odours: Sudden growth of black mould in corners or behind furniture, accompanied by a persistent musty smell, suggests the wall is holding high levels of moisture that cannot evaporate.
- Decorative Failure: Peeling wallpaper or crumbling plaster are clear signs that moisture levels have exceeded the material’s capacity to remain stable.
External Indicators to Watch For
External symptoms often precede internal damage. It’s a vital part of property maintenance to perform regular inspections of the building envelope. When the outer leaf fails to shed water effectively, the risk of penetrating damp through cavity wall increases. Look for “spalling,” where the brick face begins to flake or crumble. This happens when water-saturated bricks expertze and expand, causing permanent structural damage to the masonry surface.
- Cracked Mortar and Failed Pointing: Hairline cracks in the mortar joints provide a direct entry point for rain. Once water enters these gaps, it quickly reaches the internal insulation or debris.
- Vegetation Growth: The presence of moss, algae, or lichen on specific sections of the brickwork indicates those areas are staying wet for extended periods. This often correlates with internal damp patches.
- Rust Staining: Look for orange or brown streaks on the external masonry. This is a critical warning sign of corroding wall ties; as the steel ties rust, they expand and can eventually cause the outer leaf to bow or crack.
Why Surface-Level Repairs Often Fail to Stop Penetrating Damp
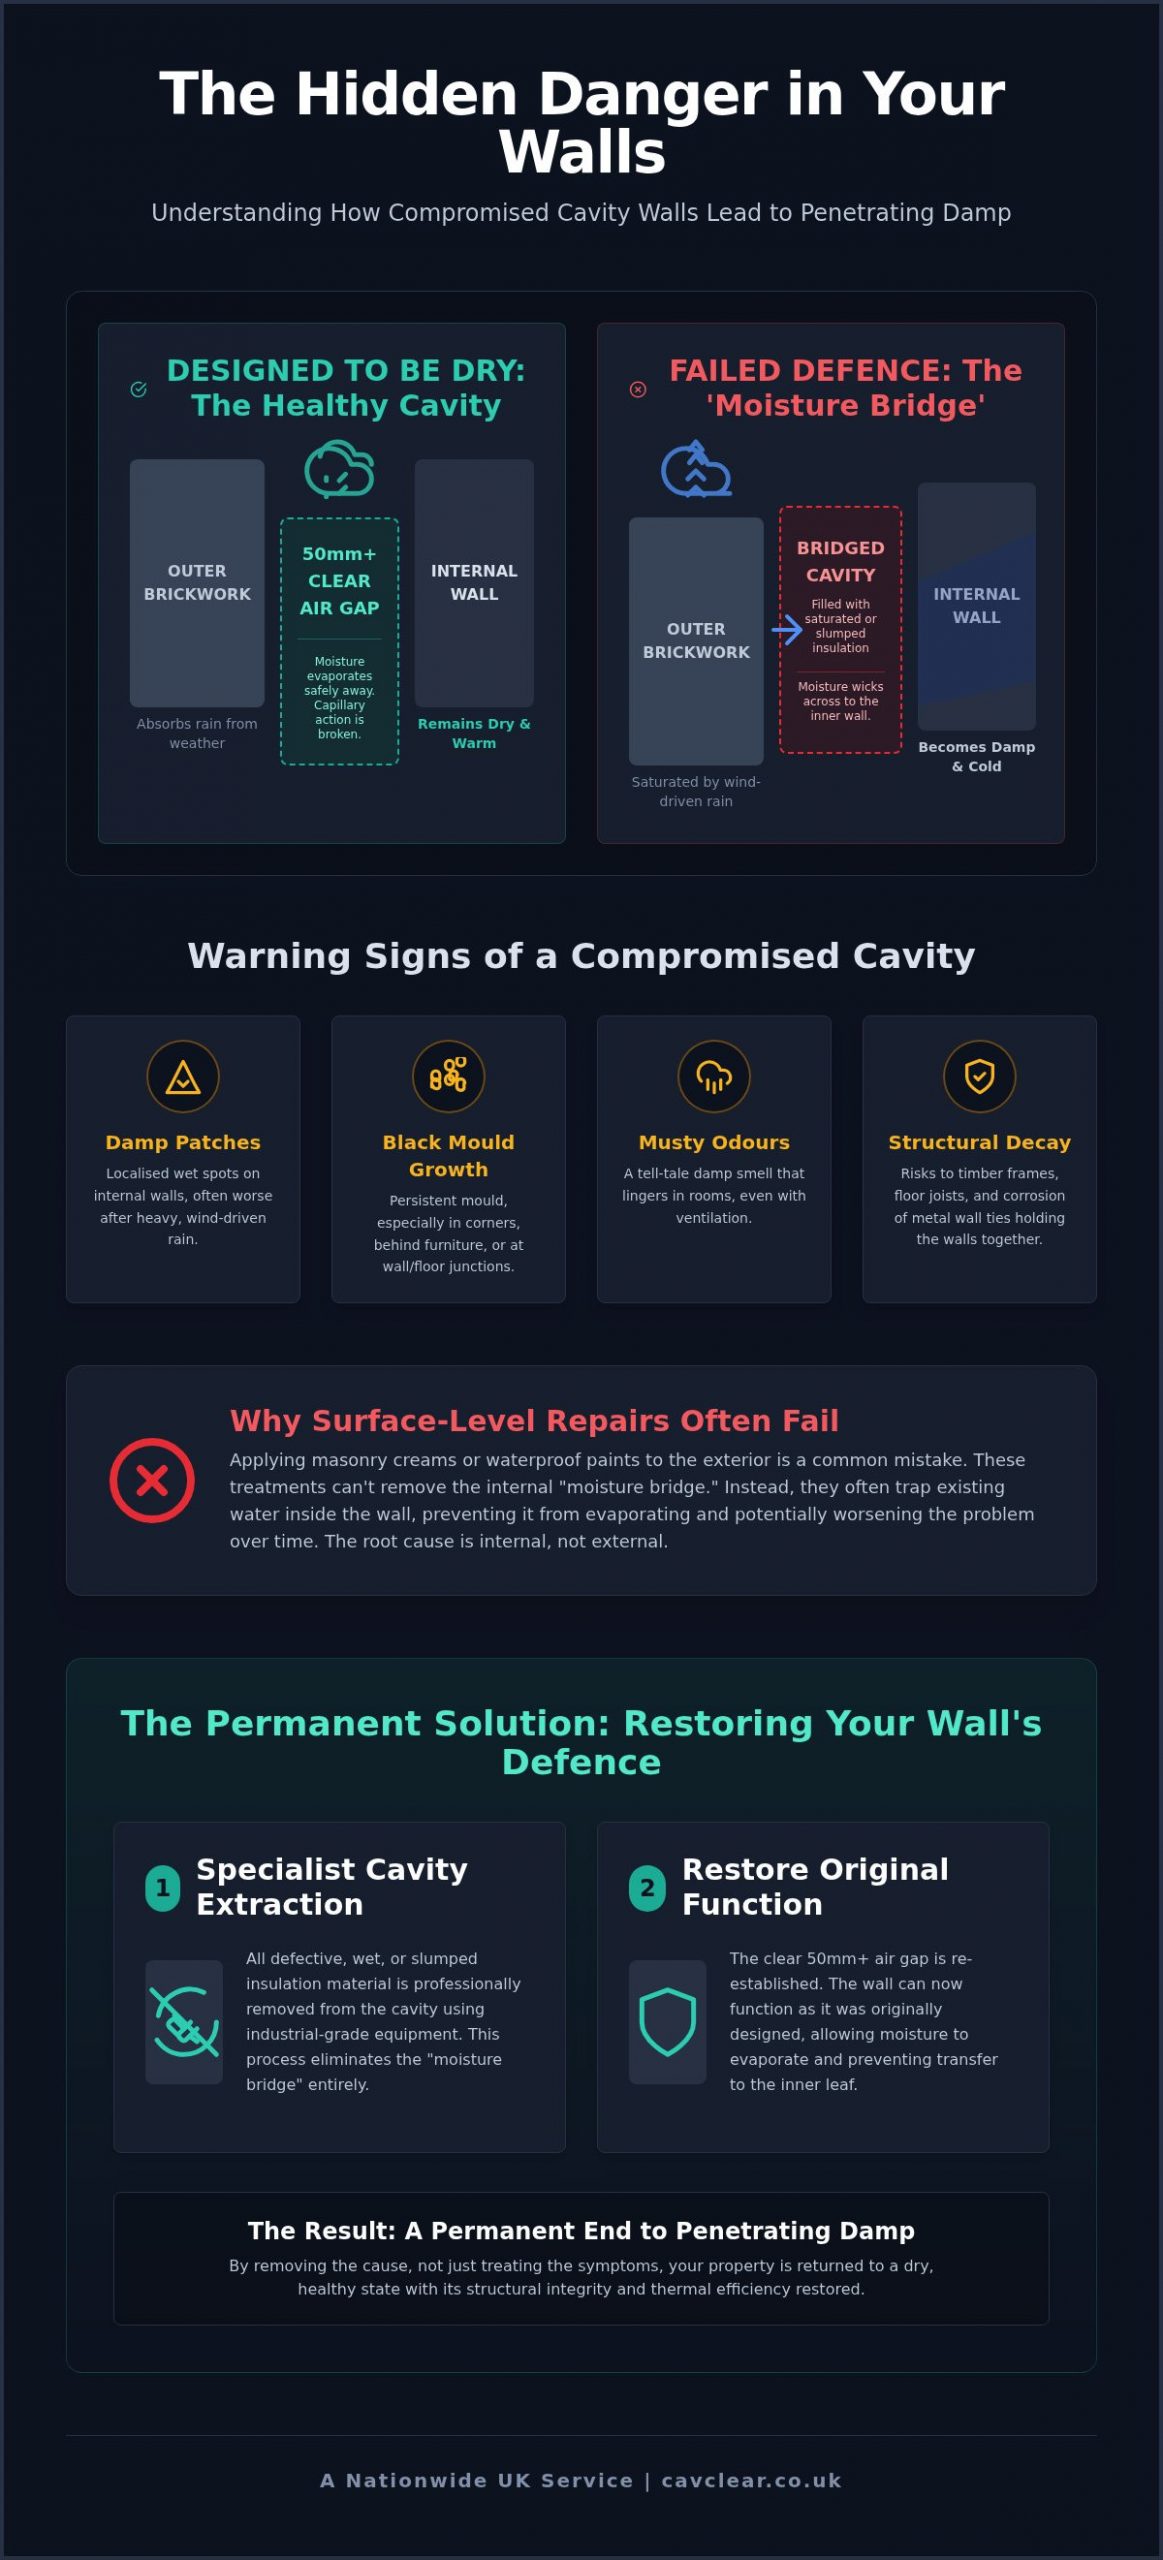
Many property owners attempt to resolve penetrating damp through cavity wall issues by focusing solely on the external facade. While repointing or applying water-repellent creams seems logical, these methods often ignore the internal moisture bridge. If saturated insulation or debris remains within the cavity, external “sealing” creates a dangerous sealant trap. This prevents the wall from breathing and locks existing moisture inside the structure, where it continues to migrate toward your internal living space.
Repointing only addresses the symptom of weathered masonry; it doesn’t remove the physical material currently conducting water across the void. When moisture is trapped, it doesn’t just stay in the brickwork. It often reaches structural timber components such as floor joists and wall plates. Over time, this leads to wet rot and structural instability. This turns a relatively straightforward moisture issue into a major safety concern that can significantly devalue your property. To avoid these risks, a professional damp survey is required before any remedial work begins.
The Failure of the ‘Quick Fix’
External coatings frequently fail under hydrostatic pressure from within. When moisture is trapped behind a waterproof barrier, it exerts pressure as it tries to evaporate. This often causes the coating to bubble or the masonry face to spall. Repeatedly paying for surface repairs is cost-inefficient because it fails to address the root cause of the bridge. Saturated insulation can take several years to dry naturally if it isn’t physically extracted from the cavity.
The Role of Professional Diagnostics
Effective resolution requires seeing what’s happening inside the wall without causing unnecessary damage. We use high-definition borescope cameras to inspect the cavity void through small, non-disruptive pilot holes. This allows us to identify slumped insulation, mortar snots, or wall tie debris that a standard visual inspection would miss. Thermal imaging further enhances this diagnostic process by pinpointing exact areas of saturated material that are invisible to the naked eye. These non-invasive surveys are the first step in structural preservation, ensuring that the chosen remedy is based on hard data rather than guesswork.
To protect your property’s long-term health and ensure a permanent fix, you should book a specialist cavity wall survey to identify the exact location of the moisture bridge.
The Professional Solution: Cavity Extraction and Structural Restoration
The only permanent way to stop penetrating damp through cavity wall structures is to restore the building’s original design: a clear, ventilated air gap. While surface treatments fail because they leave the internal moisture bridge intact, professional cavity extraction physically removes the saturated material. This process eliminates the capillary path that allows water to “wick” from the external masonry to your internal living space. By returning the cavity to its intended state, we ensure the property can shed moisture naturally and remain dry regardless of external weather conditions.
Our methodology for cavity wall insulation removal is a technical process that addresses both the insulation and any underlying structural issues. It isn’t enough to simply remove the foam or mineral wool; we must also clear construction debris and mortar “snots” that have accumulated over time. This holistic approach ensures that no physical conduits remain to facilitate future moisture transfer. Once the extraction is complete, we provide a final validation using high-definition borescopes to confirm a 100% clear and dry cavity void.
The Extraction Process Explained
Professional extraction is a clean and non-disruptive procedure that takes place entirely from the outside of the property. Our technicians use specialist, high-powered vacuum equipment to draw out defective materials through a series of small, strategically placed 22mm holes in the mortar joints. This avoids the need for any internal work or disruption to your daily life. The process includes several critical steps to ensure long-term structural health:
- Cavity Tray Clearance: We ensure the area above windows and doors is completely expert of debris to prevent water pooling.
- Weep Hole Restoration: Technicians verify that all drainage points are clear, allowing any water that enters the outer leaf to escape expertly.
- Base Cavity Cleaning: We remove all fallen material from the bottom of the cavity to protect the damp proof course (DPC) from being bypassed.
Long-Term Asset Protection
Restoring a clear cavity is a vital investment in your property’s long-term health and efficiency. By allowing the masonry to “breathe” again, you prevent the conditions that lead to timber rot in floor joists and wall plates. This is particularly important for maintaining structural integrity in older UK homes where timber components are often embedded directly into the inner leaf. A clear cavity also prevents the accelerated corrosion of wall ties, which can be an expensive and complex issue to rectify if left unchecked.
Beyond immediate damp resolution, this specialist service restores the property’s thermal performance. Saturated insulation acts as a cold bridge that pulls heat out of the home; removing it allows the internal leaf to stay dry and retain heat more effectively. As a nationwide specialist, we focus on providing a permanent fix that preserves your property’s value and ensures a healthy, mould-expert environment for the future. This isn’t just a repair; it’s a structural restoration that meets modern standards for property maintenance.
Restoring Structural Integrity and Home Comfort
Resolving penetrating damp through cavity wall structures requires a shift from temporary surface fixes to a permanent, technical resolution. We’ve explored how saturated insulation and debris turn a protective void into a destructive bridge; identifying these signs early is the first step toward structural preservation. By choosing a professional methodology that includes full cavity extraction, you effectively restore the building’s natural ability to shed moisture and breathe. This isn’t just a repair; it’s a vital investment in your property’s long-term asset health and thermal efficiency.
Our accredited nationwide technicians use specialist borescope inspections to deliver detailed diagnostic reports and permanent structural solutions. Taking proactive steps now prevents the risk of timber decay and rising energy costs associated with wet masonry. Book a Professional Cavity Wall Survey with CavClear Today to secure a dry, healthy environment for your home. We’re ready to help you reclaim the comfort and security of your property with our clean and non-disruptive methodology. Protecting your home starts with a clear, functional cavity.
Frequently Asked Questions
Can cavity wall insulation cause damp problems in my home?
Yes, cavity wall insulation is a common cause of penetrating damp through cavity wall structures when it becomes saturated. Materials like mineral wool or foam can act as a sponge, wicking moisture from the outer leaf to the internal leaf. This process effectively destroys the original defensive void of the property. It is a significant risk in high-exposure UK regions where wind-driven rain is frequent and sustained.
How do I know if my cavity wall insulation is wet?
You can identify wet insulation through internal symptoms like cold patches on walls or persistent black mould growth. Saturated material loses its thermal resistance, making specific areas feel significantly chillier than the rest of the room. However, the only definitive method is a borescope inspection. This allows a technician to view the material directly through a small pilot hole to check for slumping, debris, or moisture levels.
Will repointing my house stop penetrating damp?
Repointing won’t stop penetrating damp if the cavity is already bridged by saturated insulation or debris. While fixing mortar joints prevents further water ingress, it does nothing to remove the moisture already trapped inside the wall. The wet material will continue to conduct moisture to your internal leaf until it is physically extracted. Repointing should be considered a secondary maintenance measure once the cavity is confirmed to be clear.
Is it possible to dry out wet cavity wall insulation?
It’s virtually impossible for insulation to dry out naturally once it becomes saturated within a wall cavity. The lack of significant airflow inside the void means moisture remains trapped for years. During this time, the damp material continues to cause structural damage and high heating bills. Professional extraction is the only reliable way to ensure the cavity returns to a dry, functional state that protects your home’s structure.
What happens if I don’t remove wet insulation from my walls?
Leaving wet insulation in place leads to progressive structural decay and health risks from mould spores. The persistent moisture accelerates the corrosion of wall ties and can cause wet rot in embedded timber floor joists or wall plates. Additionally, saturated insulation acts as a thermal bridge, pulling heat out of your home. This results in significantly higher heating costs and a permanently damp, uncomfortable internal environment for your family. To restore your home’s interior comfort, you can learn more about Darcy Bespoke Cleaning for specialist carpet and upholstery cleaning to remove musty odours and spores.
How long does it take to remove insulation from a cavity wall?
For a standard semi-detached or detached home in the UK, the extraction process typically takes between one and two days. Our technicians use high-powered vacuum equipment to ensure the work is efficient and non-disruptive. The exact duration depends on the property size and the type of material being removed, such as loose-fill fibre, white wool, or bonded urea formaldehyde foam that has broken down over time.
Can I install new insulation after the old material is removed?
We strongly advise against installing retrospective cavity wall insulation after extraction. Our methodology focuses on restoring the original 50mm air gap, which is the most reliable way to prevent penetrating damp through cavity wall systems. Re-filling the void often repeats the same moisture-bridging issues. Maintaining a clear, ventilated cavity is the best investment for the long-term structural health and thermal efficiency of your property.
How much does a professional damp and cavity survey cost?
The cost of a professional survey depends on the property’s size and the specific diagnostic tools required, such as high-definition borescopes or thermal imaging. An expert assessment is a vital investment that prevents the wasted expense of misdiagnosing damp issues. By identifying the exact cause of moisture ingress, a detailed survey ensures that any remedial work is targeted and effective, ultimately preserving the long-term value of your asset.
Recent Comments