
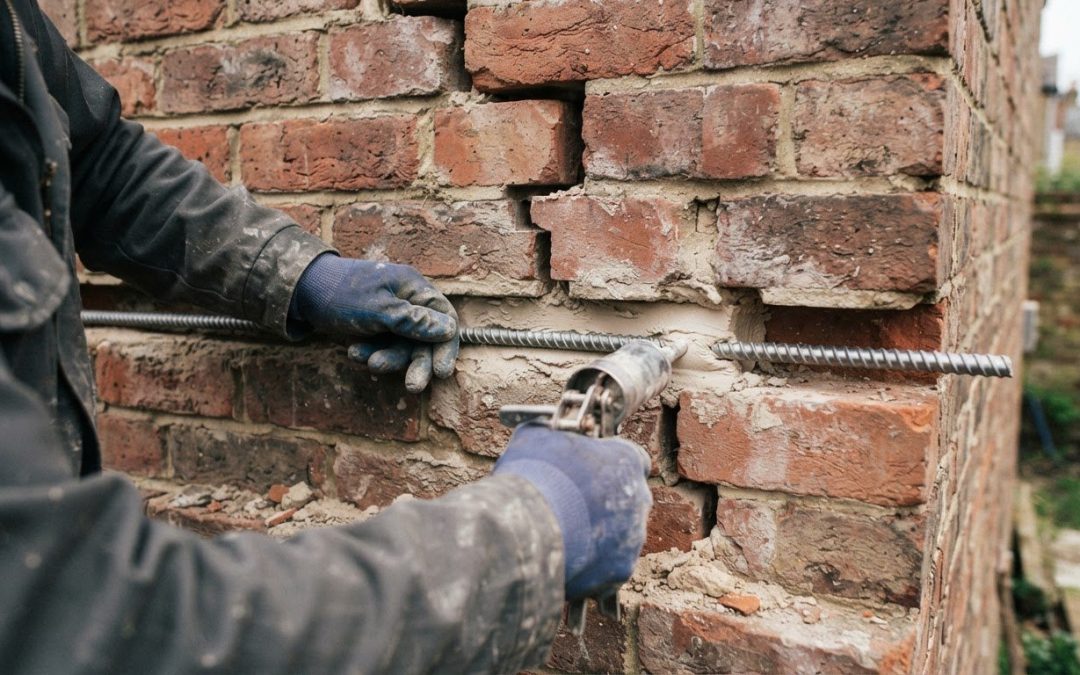
A crack in brickwork doesn’t automatically mean the wall needs rebuilding. Understanding how brickwork crack stitching works helps explain how a specialist can reinforce cracked masonry: helical bars are set into slots cut along mortar joints and grouted across the crack, helping reconnect the masonry. These bars are typically 6 mm in diameter.
It’s understandable to feel concerned when a crack appears, especially if it seems to be changing. Hairline cracks can occur with seasonal changes in temperature and humidity, so their presence alone does not show whether stitching is needed. The crack’s pattern and whether it is still moving are important considerations.
This article explains how brickwork crack stitching works, including how mortar-joint slots and helical bars reinforce cracked masonry. It also covers signs that may call for a professional assessment and why the cause of a crack needs to be understood before repairs begin. This should help you understand what the repair involves and when to seek specialist advice.
Key Takeaways
- Crack stitching embeds helical bars in grouted slots cut along mortar joints, helping reconnect cracked masonry.
- A specialist assesses the crack’s cause and whether it is still active before deciding if stitching is suitable.
- Slot depth and bar placement depend on the wall and crack layout, so careful preparation matters to the repair.
- Look at the crack’s pattern and any signs of movement; a hairline crack alone doesn’t show that stitching is needed.
- Understanding the repair method can help you discuss the wall’s condition and suitable next steps with a specialist.
What is Crack Stitching?
Crack stitching reinforces cracked masonry by embedding helical bars in mortar-joint slots that cross the crack. A specialist grouts the bars into place, connecting the separated sections of brickwork.
The repair relies on sound preparation and a suitable diagnosis. These steps explain how the process works and what it can address.
How a specialist cleans the chases and applies grout
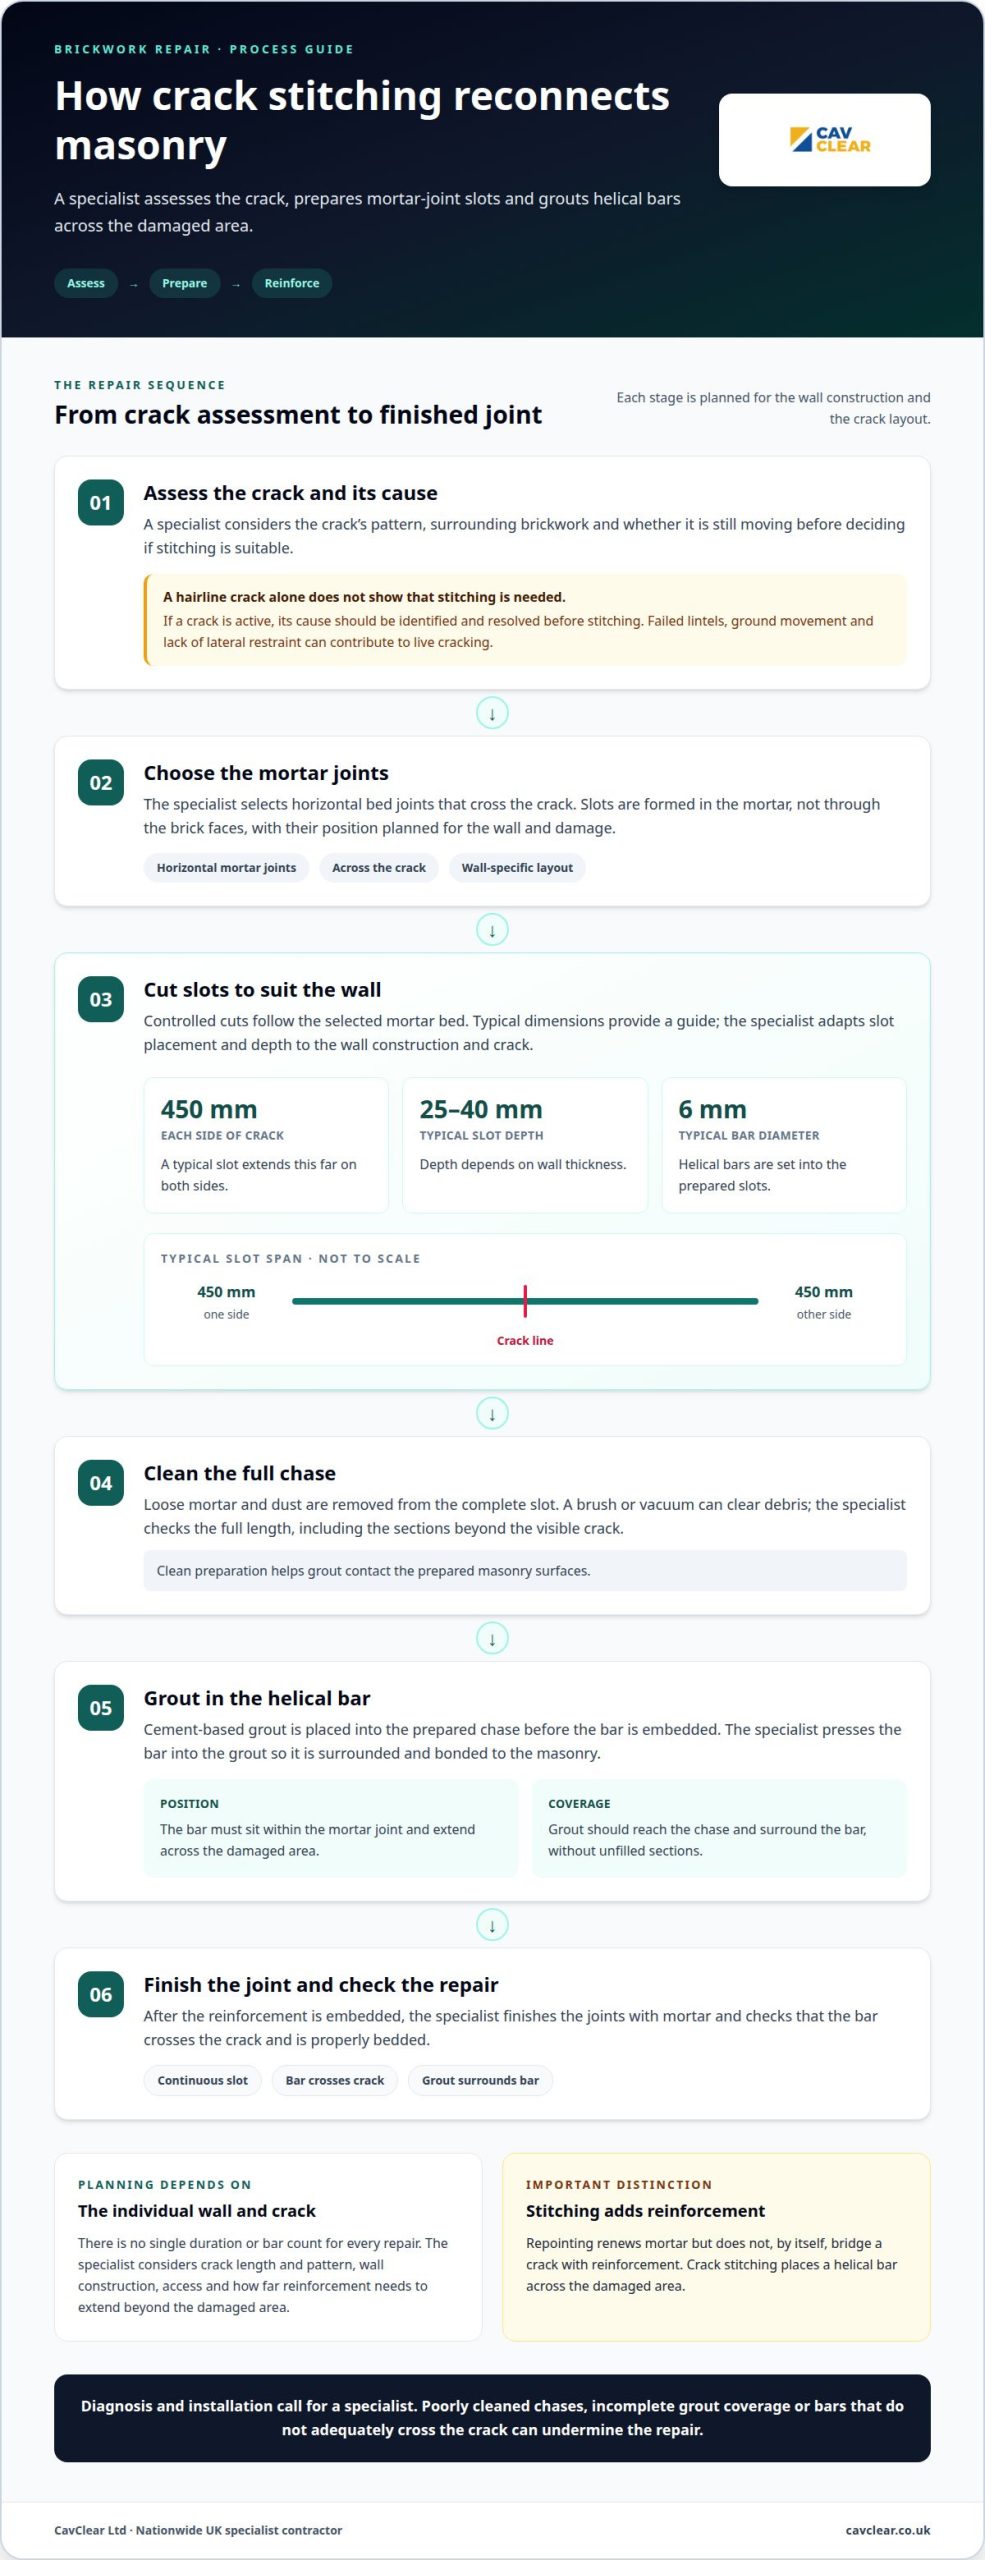
- Clean each chase before grouting. The specialist removes loose mortar and dust from the slot so grout can contact the masonry. A brush or vacuum can clear debris; the specialist checks the full length, not just the visible crack. Dirt left behind can interfere with the bond between the grout, bar and surrounding brickwork.
- Apply cement-based grout into the prepared chase. A bead is placed along the cleaned slot before the helical bar is embedded. The grout should reach the chase rather than remain only at its opening. The specialist avoids leaving unfilled sections, which could reduce contact around the reinforcement.
How a specialist bonds helical bars with resin or grout
- Embed the bar in grout and maintain coverage. The specialist presses the helical bar into the prepared slot so grout surrounds it and bonds it to the masonry. For brickwork crack stitching, cement-based grout is recommended over resin. The choice matters because the bar needs a continuous connection with the bed joint, not simply a surface coating.
- Check that the bar crosses the crack. The helical bar must extend across the damaged area and sit within the mortar joint. Its position and length depend on the crack layout and wall. A bar that stops short of the crack, or is poorly bedded, cannot provide the intended connection.
- Understand what stitching does before choosing a repair. Repointing renews mortar at a joint but doesn’t, by itself, bridge a crack with reinforcement. Crack stitching places a helical bar across the damaged area. Resin injection fills a crack rather than installing a bar across mortar joints, while rebuilding replaces masonry and may be considered where damage or instability calls for more extensive work.
- Use a qualified professional for diagnosis and installation. Homeowners shouldn’t treat crack stitching as a routine DIY repair. A specialist contractor assesses the wall and the crack’s cause; a structural engineer may be appropriate where movement or structural stability needs assessment.
- Allow the specialist to select the tools and materials. The work uses cutting equipment to form mortar-joint chases, cleaning tools to remove debris, helical bars, and grout applied into the slots. The specialist also finishes the joints with mortar after the reinforcement is embedded.
- Base the programme and bar quantity on the wall. There is no single duration or bar count for every repair. The specialist considers crack length and pattern, wall construction, access, and how far reinforcement must extend beyond the damaged area.
- Recognise where stitching has limits. If a crack is still moving, the cause should be identified and resolved before stitching. Failed lintels, ground movement and lack of lateral restraint can contribute to live cracking. Poorly cleaned chases, incomplete grout coverage or bars that don’t adequately cross the crack can undermine the repair.
Cutting slots in horizontal mortar joints
A specialist forms horizontal slots in the mortar joints so reinforcement can cross the crack without cutting through the bricks. The slot depth and position depend on the wall’s construction and the crack’s layout, so preparation is planned for the particular wall.
- Assess the crack and select the mortar joints. The specialist identifies where horizontal slots will cross the vertical crack and checks the surrounding brickwork before cutting. Slots are typically positioned in bed joints, not through the brick faces. This keeps the reinforcement within the mortar courses and helps limit unnecessary disruption to the masonry.
- Set the slot length across the damaged area. A typical crack-stitching slot extends 450 mm on each side of the vertical crack. That length allows the helical bar to reach beyond the visible line of damage. The specialist adapts the arrangement to the wall and crack rather than treating the visible opening as the full extent of the repair.
- Choose a suitable depth for the wall. Slots are typically cut 25-40 mm deep, depending on wall thickness. The depth must accommodate the reinforcement and grout while retaining sound masonry around the chase. The specialist considers the wall construction before cutting, because using the same depth indiscriminately can produce an unsuitable slot.
- Cut along the mortar bed with controlled alignment. The specialist follows the selected horizontal joint so the chase stays level and crosses the crack at the intended point. Accurate alignment gives the bar a continuous route through the masonry. Cutting out of the mortar bed can damage brick edges or leave the bar poorly positioned.
- Prepare the chase for reinforcement. After cutting, the specialist clears loose mortar and debris from the slot. A clean, continuous chase gives grout contact with the prepared surfaces and leaves space for the helical bar. The full length needs attention, including the sections extending beyond the crack on both sides.
- Check the prepared slot before inserting the bar. The specialist checks that the chase follows the mortar joint, reaches the planned length and has the required depth. For a general grout estimate, the assumed slot is 10 mm wide and 25 mm deep, then finished with normal sand-and-cement mortar. Actual slot dimensions depend on the repair design.
- Keep the work area controlled during cutting. Cutting mortar creates debris, so the specialist manages the area and clears residue before grouting. Careful preparation helps keep disruption focused on the required joints. It also prevents loose material from remaining in the chase, where it could interfere with the next stage of the repair.
How crack stitching reconnects cracked masonry
The appropriate repair method depends on the wall and the design of the work; no single stitching layout suits every crack. An assessment considers the construction, the cause of cracking and the intended performance before a method is specified.
- Assess the crack’s pattern and condition. The specialist examines whether the crack is vertical, stepped or following a mortar joint, then considers its position across the wall. A crack that continues to change needs a different response from one that is no longer active. Stitching reinforces masonry, but it doesn’t remove the cause of movement.
- Identify what caused any continuing movement. Before stitching a live crack, the cause should be identified and resolved. Possible causes include a failed lintel above an opening, ground movement or lack of lateral restraint. Each points to a different underlying issue, so placing bars over the crack alone may leave the source of movement untreated.
- Plan the bar arrangement across the crack. The specialist positions helical bars in horizontal mortar joints so they cross the damaged line and connect masonry on both sides. The bars sit within grout in the prepared slots. This creates reinforcement across the crack rather than simply filling its visible opening.
- Set the vertical spacing to suit the repair. The normal spacing for brickwork crack stitches is 450 mm, equivalent to 6 brick courses. This gives the repair a repeated connection along the crack’s height. The specialist considers the crack pattern and wall construction when setting out the positions, rather than assuming one layout fits every wall.
- Use the bar’s properties to reinforce the joint. A helical bar combines axial strength with rotational flexibility. This allows the reinforcement to accommodate natural cyclic movement while continuing to support cracked masonry. The bar helps tie sections of brickwork together, but it isn’t a substitute for resolving an active cause such as a failed lintel.
- Embed each bar securely in the prepared joint. Grout bonds the helical reinforcement to the masonry along the slot. A continuous bond transfers the reinforcing effect across the crack and into the surrounding wall. Gaps or poor contact can weaken that connection, which is why the prepared chase and bar placement matter.
- Relate the repair design to the wall. The relevant technical approach for UK masonry repairs depends on the building’s construction, the crack’s cause and the intended repair. A structural professional assesses those factors before specifying the method, including how reinforcement should cross the crack and connect the affected masonry.
Crack-stitching method statements for different wall types
A method statement sets out how the specialist will position and install the bars for the particular wall. The details around wall ends and openings matter because they affect how the reinforcement extends beyond the crack.
- Record the wall layout before setting out bars. The specialist notes the crack’s position relative to wall ends, corners and openings. A method statement should show where each bar starts, finishes and changes direction. This makes the installation sequence clear and helps avoid treating every wall as an uninterrupted flat surface.
- Allow bars to extend beyond the crack. A helical bar should extend at least 500 mm beyond the crack on each side. The method statement records this length so the reinforcement reaches masonry beyond the visible damage. The specialist positions the bar within the planned mortar joint and checks the crack’s location against its full route.
- Detail the repair when the crack approaches a wall end. If the crack is within 500 mm of a wall end, the bar should continue at least 100 mm around the corner and be fixed into the adjoining wall. This return connects the cracked section with the intersecting wall, rather than leaving the bar ending beside the corner.
- Specify a return at an opening. If a crack is within 500 mm of an opening, the helical bar should be bent back and fixed into the reveal. The reveal is the side surface inside the opening. The method statement should identify this change in direction, so the bar’s end is anchored into the return rather than stopping at the opening edge.
- Match the bar route to the wall’s features. A flat wall section allows a straight bar route, while a nearby corner or opening can require a return. The specialist uses the wall layout to determine the appropriate arrangement. These details matter because a bar’s path must cross the crack and continue into the connected masonry.
- Set out the installation sequence clearly. The method should describe the planned slot, bar position, grout placement and joint finish. It should also show how corner returns or reveal fixings fit into that sequence. Clear instructions help keep the work consistent across each course and prevent a change in wall shape being overlooked.
- Finish the stitched crack against moisture exposure. The page advises sealing stitched cracks with epoxy crack filler to protect against moisture and expertze-thaw action. The method statement can include this finishing stage after the bars and grout are installed. It should distinguish surface sealing from the bar’s structural role within the mortar joints.
- Check that the completed layout follows the plan. The specialist compares the installed bars with the wall details, including any 100 mm corner return or reveal fixing. A final review confirms the reinforcement follows the specified route and the crack has been treated as part of the whole wall layout.
Signs that brick walls may need crack stitching
Note the crack’s position, pattern and any visible changes before arranging an assessment.
Recognise signs of wall cracking
Record where the crack starts and ends, such as above a window or across a brick wall. Check whether it follows mortar joints, crosses bricks or forms a stepped line. Hairline cracks can occur with seasonal changes in temperature and humidity, so a fine line alone does not show that stitching is needed.
Identify cracks suitable for stitching
Ask a specialist to assess the crack’s cause and whether it remains active. Stitching may be considered for non-active or cyclic cracks, but an active crack needs its cause addressed first. Its shape alone does not determine whether stitching is suitable; a specialist considers the masonry and signs of movement.
- Document the visible pattern. Note whether the crack is vertical, stepped or horizontal, and whether it crosses bricks or follows mortar joints. For example, a stepped crack near a window gives the specialist a location to assess alongside the opening and surrounding masonry.
- Look for changes over time. A crack that appears to widen, lengthen or recur after earlier repairs may indicate ongoing movement. Record when you notice changes and where they occur. These observations help a specialist distinguish a stable crack from one that still needs investigation.
- Consider nearby wall features. Cracks above openings may relate to a failed lintel; other possible causes include ground movement or lack of lateral restraint. These are examples, not a diagnosis. A specialist assesses the wall and surrounding features before recommending reinforcement.
- Don’t treat appearance as a diagnosis. A hairline crack can result from seasonal temperature and humidity changes, while a more pronounced crack still needs its cause assessed. Width or visibility alone cannot establish whether stitching is appropriate or whether movement has stopped.
- Have active movement assessed first. Crack stitching may be considered for non-active or cyclic cracks. If masonry is still moving, the cause should be identified and resolved before bars are installed. Otherwise, reinforcement could address the visible line without addressing the issue affecting the wall.
- Discuss the assessment with a suitable specialist. Share the crack’s location, pattern and observed changes. The specialist considers whether the cause has been dealt with, whether the masonry is suitable for reinforcement, and how the crack crosses the wall. Those findings guide the recommendation.
- Use the assessment to decide the next step. Stitching is a possible repair for cracks assessed as suitable, not a remedy for every damaged wall. A professional assessment can determine whether reinforcement is appropriate or whether another response to the underlying cause is needed.
CavClear
CavClear can investigate whether cracking may be connected to cavity wall issues, including failing wall ties. A Wall Tie Survey or Cavity Wall Survey can assess the wall and provide findings to inform suitable remedial decisions. This can help when cracks appear alongside signs of movement or their cause is unclear. The survey helps distinguish a cavity wall concern from other possible causes, so the next step can reflect the property’s condition, not just the crack’s appearance.
If you’re concerned about cracking or possible wall tie failure, contact CavClear to discuss your property and the relevant survey options.
Take the next step with confidence
Understanding how brickwork crack stitching works can help clarify the repair options, but the right next step depends on why the wall has cracked. If you’re concerned about movement, first arrange an assessment of the masonry and any related cavity-wall issues. This gives you a clearer basis for deciding whether further investigation or remedial work is appropriate.
CavClear offers Wall Tie Surveys and Wall Tie Replacement where failing ties may be relevant. Its services also include Cavity Wall Insulation Removal when defective insulation is the issue being assessed. These are distinct services, chosen to address the property concern, and are not substitutes for diagnosing every crack.
If a crack is worrying you or changing, share your concern and arrange an appropriate next step. Contact CavClear about brickwork cracks to discuss your property. A clear assessment can help you move forward with an informed plan for the wall’s long-term condition.
Frequently Asked Questions
What does a wall crack mean?
A wall crack is a visible separation in the surface, but it does not identify its cause. Its location can help guide an assessment: for example, a crack near a window differs from one in an uninterrupted section of wall. Note where it begins and ends, and whether it changes over time. This record gives a specialist useful context without requiring you to diagnose the problem.
When does a crack in brickwork need fixing?
Arrange an assessment if a crack is changing, returning after earlier repairs, or appearing alongside other signs of movement. Whether a repair is needed depends on the masonry’s condition and the cause of the cracking, not simply on whether the line is visible. A specialist can explain whether the issue needs attention, what further assessment may help, and which repair approach suits the wall.
What is brickwork crack stitching and how does it work?
Brickwork crack stitching is a specialist repair used to reinforce suitable cracked masonry. Unlike a cosmetic patch, it is intended to strengthen the connection across the affected area, not simply hide the crack. Understanding how brickwork crack stitching works can help you discuss the repair’s purpose, but an assessment must establish whether the wall and crack are suitable for this method.
How are helical crack-stitching bars installed in brickwork?
A specialist installs helical bars as part of a planned repair, then finishes the affected mortar joints to integrate the work with the surrounding brickwork. The arrangement depends on the wall, so the visible crack alone cannot show how many bars are needed. Understanding how brickwork crack stitching works also means recognising that the surface finish and reinforcement have different roles.
How does a specialist identify and address the cause of a crack before stitching?
A specialist assesses the crack alongside the surrounding wall, its construction and any relevant repair history. This wider view helps determine whether the damage is isolated or linked to a broader masonry concern. Explain when you first noticed the crack and whether it has changed or returned after previous work. Those details can help focus the inspection and inform the recommended next step.
Recent Comments