
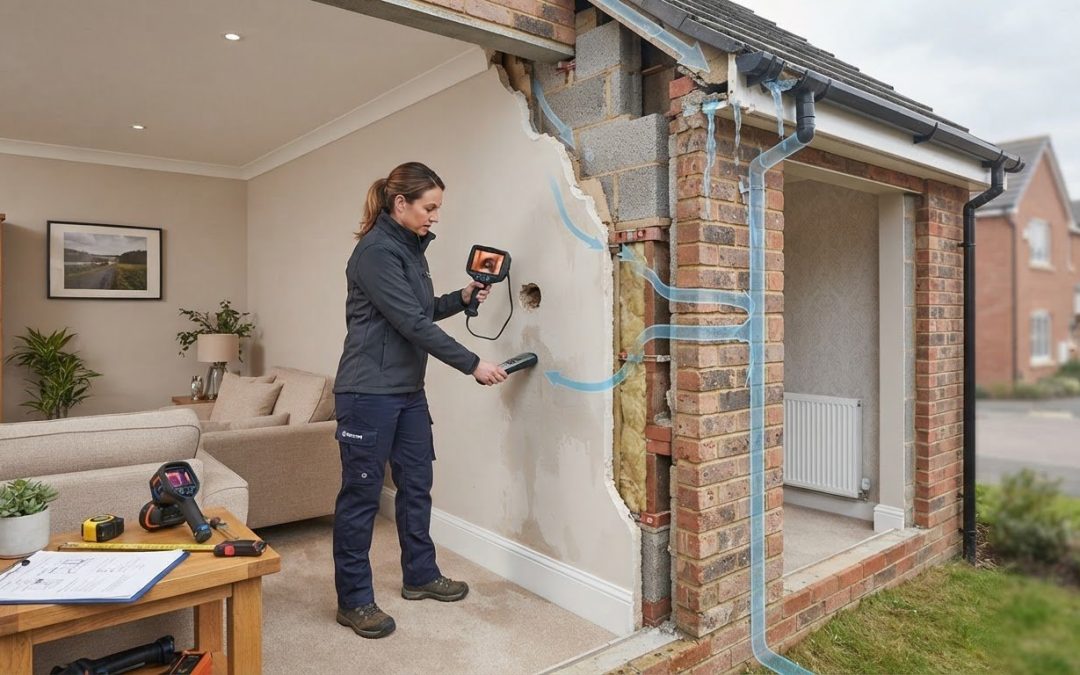
If you’re searching “my neighbour’s property is causing damp in my home what are my rights”, first establish where the moisture is coming from. A visible defect next door may look like the obvious cause, but appearance alone cannot show whether water is crossing between properties. Damp beside a shared wall can also stem from a problem within your own home or a cavity-wall defect.
It’s understandable to suspect a neighbouring leak or damaged gutter when damp or mould appears along an adjoining wall. However, condensation, plumbing leaks and penetrating moisture can produce similar signs. Recording what you observe and investigating the moisture route helps avoid assuming a cause before there is evidence.
This article explains what to look for, which photographs and notes can help a specialist assess the issue, and when a cavity-wall survey may be useful. CavClear carries out specialist cavity-wall inspections using calibrated equipment and provides written reports with findings and remedial recommendations where appropriate.
Key Takeaways
- Damp near a shared wall does not prove that moisture has come from next door. Several internal and external causes may need to be considered.
- If you’re asking “my neighbour’s property is causing damp in my home what are my rights”, begin by recording the symptoms and investigating the moisture route rather than drawing conclusions from the location of the damp.
- Keep dated photographs and note when affected areas change. These observations can help a specialist understand the pattern.
- A cavity-wall survey may investigate possible defects using tools such as borescope cameras, metal detectors and wall-tie locators.
- A written survey report can document findings and set out remedial recommendations where appropriate.
Damp Near a Neighbouring Property: What Could Be Happening?
Damp close to an adjoining home can be unsettling, particularly if you have noticed a defect next door. But a stain on your wall is a symptom, not proof of where the moisture started. The cause could relate to your own property, exposure to rain, a cavity-wall defect or, in some cases, a route from a neighbouring structure. The building’s construction and the pattern of the affected area help guide an investigation.
Moisture transfer means water has moved from one part of a building or connected structure to another. It does not happen automatically because homes share a boundary. There needs to be a physical route, such as connected or damaged masonry, a gap or another defect that allows moisture to pass. Finding evidence of that route is more useful than judging the source by proximity alone.
Can moisture pass through an adjoining wall?
Moisture can affect connected masonry when a pathway exists. For example, water entering through a defect in an external wall may move through masonry and appear on an internal surface. The route depends on the wall’s construction and condition. A shared boundary, by itself, does not show that moisture has crossed from the neighbouring property.
Observations from both inside and outside your home may help an assessment. Note which wall and height are affected, and whether the damp is localised or follows a longer area. Outside, visible issues such as damaged pointing, a leaking gutter or repeated wetting near the wall can provide useful context. These details can guide an investigation, but do not confirm a cause on their own.
Why a damp patch does not identify its cause
Damp staining, mould, peeling paint and a cold spot are clues to record, not diagnoses. Condensation, leaks and penetrating moisture can produce overlapping signs, and similar moisture problems may appear differently in different buildings. A patch beside a shared wall may be related to the boundary, but it could also have another source within your home.
Describe what you can see without guessing at the explanation. Note the patch’s location, approximate size and appearance, and whether it changes over time. Record when you first noticed it and whether it seems worse after particular weather or household activities. Dated photographs can show changes clearly. If you’re asking “my neighbour’s property is causing damp in my home what are my rights”, identifying the moisture source is a practical first step.
The wall’s position and exposure matter too. A wall exposed to persistent rain may need to be assessed differently from an internal wall beside a bathroom or kitchen. Solid masonry and cavity-wall construction can provide different routes for moisture, so a useful assessment considers the building and its conditions rather than treating every damp patch in the same way.
How Moisture May Travel Through Cavity Walls
A cavity wall has an outer leaf and an inner leaf, with a space between them called the cavity. Wall ties connect the two leaves, and some cavity walls also contain insulation. These features do not mean moisture will pass from one side to the other. Water needs a route, and whether one exists depends on the wall’s construction and condition.
Moisture may affect masonry directly or cross a cavity if something provides a physical connection between the outer and inner leaves. A suspected pathway needs to be distinguished from a confirmed defect. The position of a damp patch, or the presence of insulation, is not enough to identify how moisture reached an internal surface.
How cavity bridging and insulation may be relevant
Cavity bridging describes material that spans the gap between the wall leaves. Mortar droppings or debris left during construction may form a connection. If moisture reaches this material, it could provide a route across the cavity. Its presence and relevance cannot be established simply by looking at a damp patch indoors.
Insulation may also be relevant to an investigation. If it is defective, damp or unsuitable for the wall conditions, it may contribute to a moisture problem. That does not mean all cavity wall insulation is defective or needs removal. The condition of the wall and insulation should be assessed before deciding whether cavity wall insulation removal is appropriate.
When wall ties may need specialist inspection
Wall ties connect the inner and outer leaves of a cavity wall. Corrosion or deterioration can affect a tie’s condition, but damp symptoms alone do not show whether ties are affected. Concerns about their condition call for a cavity-wall assessment rather than a diagnosis based on a surface mark.
Cracking or movement in brickwork can have several possible causes. A crack near damp may prompt questions about the wall, but it does not prove that wall ties have failed or that moisture has crossed the cavity. The relevant evidence depends on the property and the pattern of visible changes.
If you’re searching “my neighbour’s property is causing damp in my home what are my rights”, it helps to distinguish a possible moisture route from a confirmed cavity-wall defect. An assessment can consider whether bridging, insulation condition or wall ties are relevant, alongside other features of the building. Evidence from the property helps identify suitable next steps without assuming that a particular issue, or the neighbouring home, is responsible.
Does Damp from a Neighbour’s Property Always Cross the Boundary?
No. A damp patch beside a boundary does not prove moisture has travelled from next door. Its position may make an external source worth investigating, but moisture could instead come from a leak within your home, condensation or another feature of the building. Even if the neighbouring property has a visible defect, an assessment needs to establish whether there is a physical route connecting it to the affected area.
Symptoms indicate where to investigate, not what caused the damp. Treat observations as clues rather than conclusions. Note where the affected area sits in relation to the shared wall and nearby external features, such as a gutter or exposed masonry. If the patch changes after wet weather, record that timing too. A pattern may help guide an inspection, but it does not prove a particular source.
Clues that may point towards an external moisture route
Look for context rather than one tell-tale sign. Damp close to an external wall, an adjoining structure or an area exposed to rain may warrant closer examination. You can also note visible defects, such as damaged pointing or a gutter that appears to leak, and describe only what you observe. Do not assume a visible defect is connected to indoor damp without evidence.
The observations below can help organise what to discuss during an assessment. They are not a self-diagnosis checklist.
Observation: Damp is close to an external or adjoining wall. Question for an inspection: What is the wall’s construction, and is there evidence of a moisture route?
Observation: The affected area seems to change after rain. Question for an inspection: Could weather exposure be relevant, or is the timing coincidental?
Observation: A gutter, pointing or nearby masonry looks damaged. Question for an inspection: Is the visible condition linked to moisture inside the home?
Observation: Mould or a cold spot appears indoors. Question for an inspection: Could condensation, a leak or more than one factor be involved?
Other causes an inspection may need to consider
Moisture inside a home can have several explanations. A plumbing leak may affect a local area, while condensation can contribute to mould, particularly on colder surfaces. A cold spot does not identify its cause by itself. Building layout, wall construction and other property-specific conditions can influence where symptoms appear and what evidence needs to be checked.
A sound assessment considers the construction and moisture evidence together rather than assigning a cause from appearance alone. If you’re wondering whether my neighbour’s property is causing damp in my home, first establish whether the signs point to a cavity-wall concern or another source. Where a cavity-wall defect is suspected, a specialist survey can investigate the construction and document findings without treating proximity as proof.
What to Do if a Neighbouring Property Is Contributing
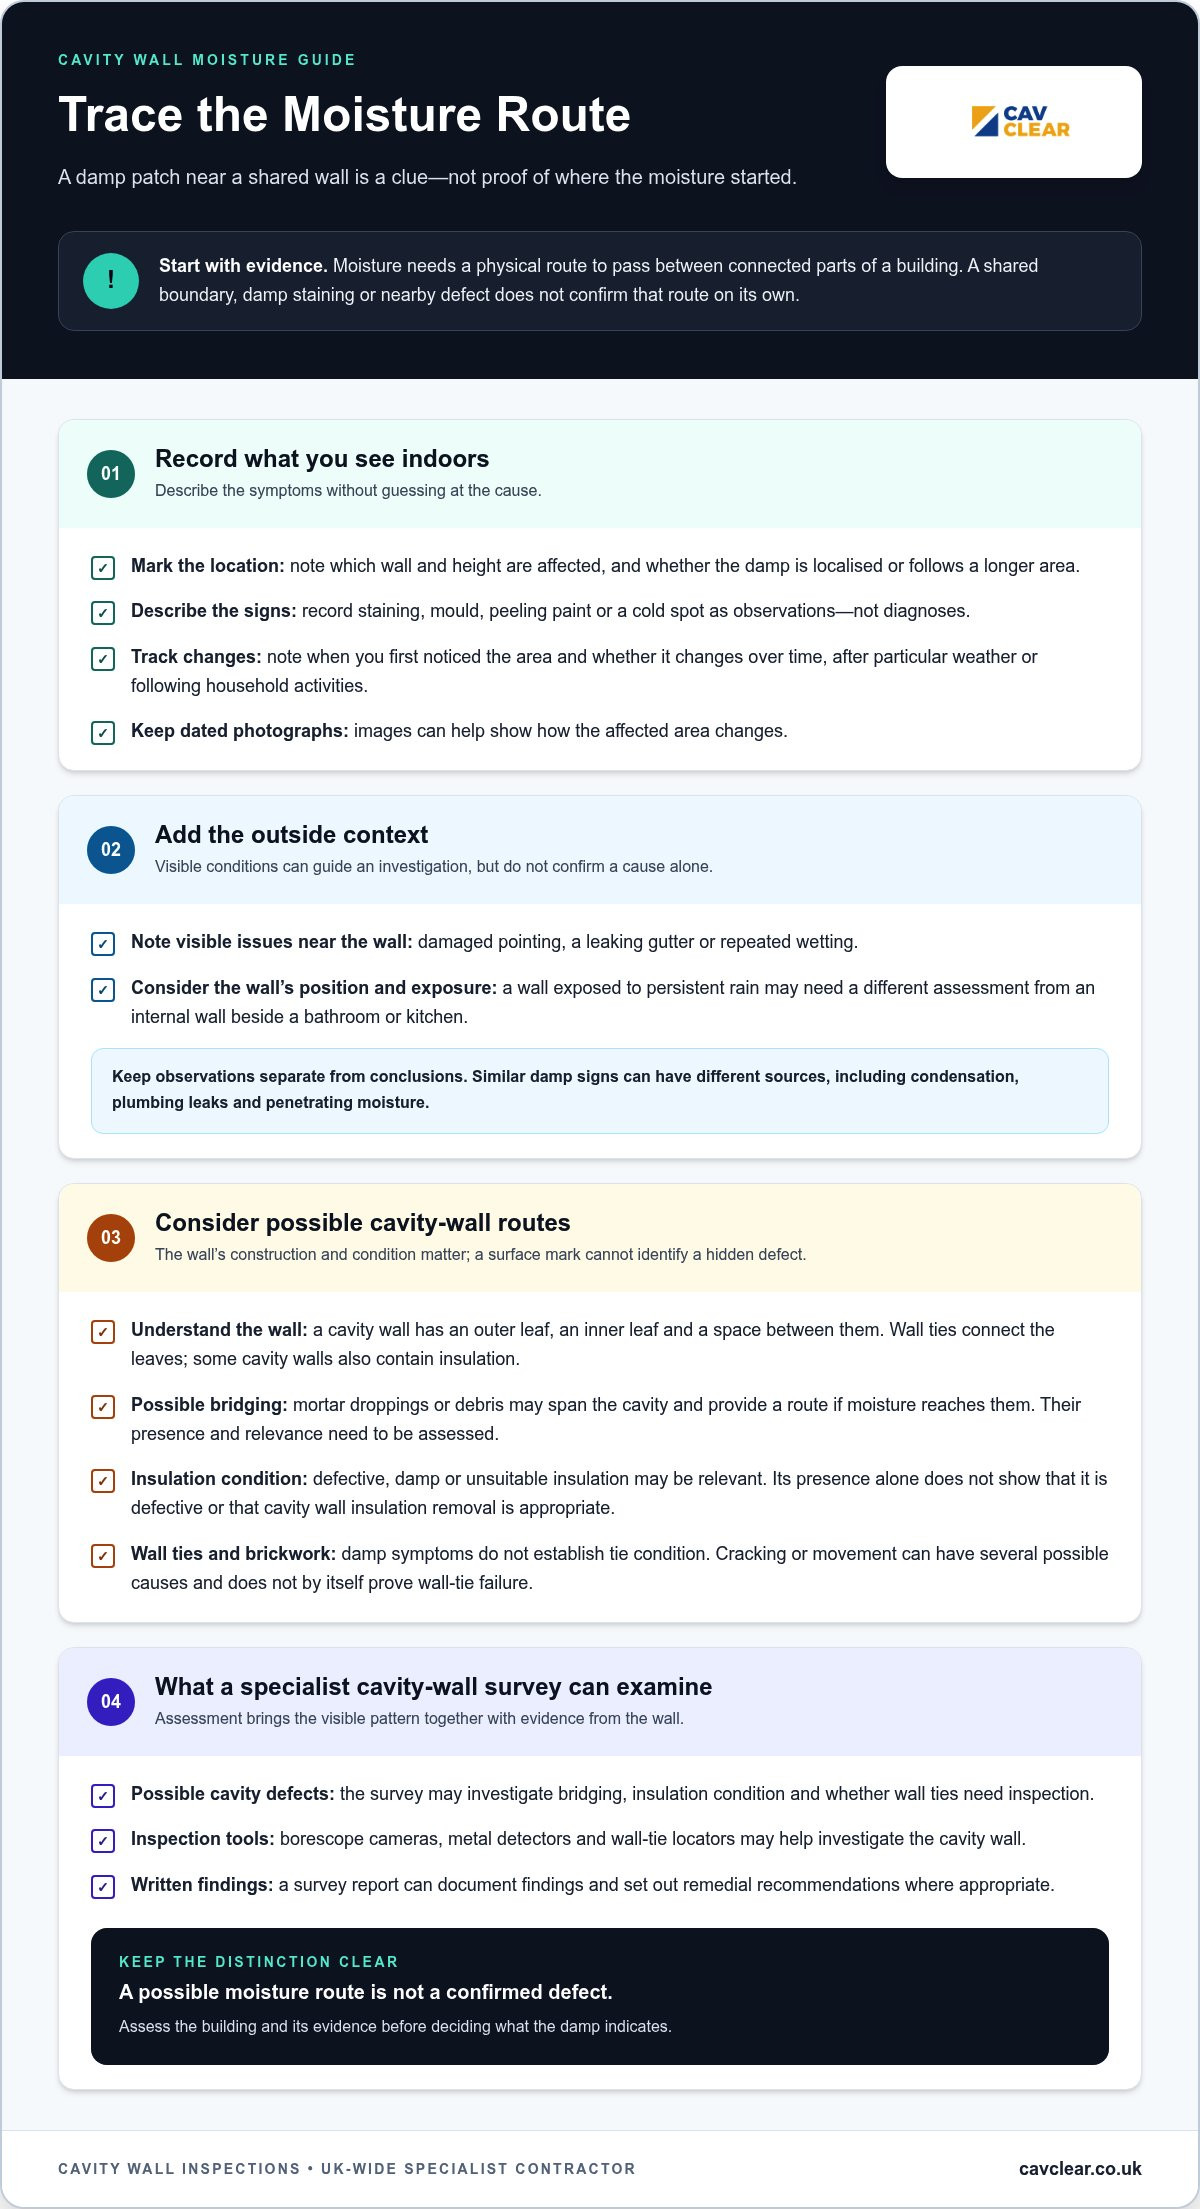
Take a measured, evidence-led approach. A clear record of what you have observed can help a specialist assess the damp without treating a suspected source as established fact. It can also help you explain your concern calmly if you speak with your neighbour.
- Note the symptoms. Record which room and wall are affected, where the patch appears, and whether you see staining, mould, peeling finishes or other changes.
- Check accessible conditions. From your own property or a public area, note visible features near the affected wall, such as a gutter or external masonry. Do not enter another property or disturb building materials.
- Speak calmly with your neighbour. Explain what you have noticed and ask whether they are aware of a relevant leak or maintenance issue. Keep the conversation factual and avoid presenting a suspected cause as confirmed.
- Arrange a suitable assessment. If the location or construction suggests a possible cavity-wall issue, a specialist inspection can investigate that part of the building. Avoid choosing remedial work based only on the appearance of one patch.
Record what you can observe safely
Take dated photographs from consistent positions so you can compare the affected area over time. Note its approximate size and appearance, along with any changes after wet weather or changes to nearby visible conditions. These details provide context, not proof of a moisture route. A written record helps an inspector compare the symptoms with the property’s condition.
Keep notes neutral. For example, write “dark mark below the window, first noticed on Monday” rather than “water from next door caused the mark”. If the affected area changes, add the date and describe what looks different. Do not scrape finishes, open the wall or try to inspect a cavity yourself.
Prepare for a useful property assessment
Gather your photographs, dated notes and any available information about the wall or previous observations. Tell the surveyor what you have seen and what makes you suspect an adjoining source, while distinguishing observations from possibilities. This helps the inspection consider the property’s construction alongside the symptoms.
Ask for the findings and recommended next steps to be set out clearly in a written report. A cavity-wall survey can document relevant findings and remedial recommendations where appropriate. If your concern is that a neighbour’s property is causing damp in your home, keep the immediate focus on establishing the moisture source and understanding what the evidence shows.
For a cavity-wall concern, arrange a specialist cavity-wall survey to investigate the construction and record the findings before deciding on remedial work.
When a CavClear Cavity-Wall Survey Can Help
A specialist cavity-wall survey may be appropriate if damp appears close to a cavity wall and the building’s construction could be relevant. It can help establish whether the wall warrants further investigation, rather than treating proximity to a neighbour as evidence of a cause. CavClear carries out specialist cavity-wall surveys and inspections nationwide across the United Kingdom for homeowners and property professionals.
What a specialist cavity-wall inspection can examine
The survey focuses on the cavity wall’s condition and construction, including whether the available evidence points to a cavity-wall concern. CavClear’s trained specialists use calibrated equipment, including metal detectors, borescope or endoscope cameras, and wall-tie locators to help examine and assess the wall. The inspection scope depends on the property and what can be assessed. This can be useful where an adjoining wall, insulation or another cavity feature is suspected, but the source of damp remains uncertain. Findings relate to the inspected property, not assumptions about a neighbouring home.
From written findings to appropriate next steps
A survey helps determine whether the evidence supports a cavity-wall issue and what action may be suitable. Wall-tie replacement may be considered if the inspection identifies a relevant tie problem. Cavity wall insulation removal is considered only where insulation is defective, damp or causing issues. Neither option is automatic, and an inspection cannot guarantee that a particular remedy will resolve every damp problem.
CavClear provides a detailed written report with photographs and findings, with remedial recommendations and a quotation where required. Survey fees vary according to the property, construction, access and scope of the inspection, so a property-specific quotation is needed. CavClear is a member of the Wall Tie Installers Federation and TrustMark registered for cavity wall insulation removal. Work is carried out from the exterior wherever possible to minimise disruption inside the home.
Arrange a nationwide specialist survey
If you’re asking “my neighbour’s property is causing damp in my home what are my rights”, a cavity-wall survey can help you understand whether the wall itself may be involved. It provides a practical basis for considering next steps without presuming that your neighbour’s property is responsible. CavClear’s specialist surveys are available to property owners throughout the United Kingdom.
Arrange a specialist cavity-wall survey to investigate a possible cavity-wall concern. For enquiries, call 0333 220 2463 or email info@cavclear.co.uk.
Take the Next Step Towards a Clearer Answer
Damp near a shared boundary can leave you unsure where to begin. If you’re searching “my neighbour’s property is causing damp in my home what are my rights”, focus first on understanding the cause. Avoid committing to remedial work based on appearances alone. A considered assessment can help identify what deserves attention and guide your next steps.
You do not need to know the source before seeking specialist help. Describe what you have observed, share any dated photographs and explain why you suspect a cavity-wall issue. This gives the investigation a practical starting point and helps keep decisions grounded in evidence rather than assumptions.
Arrange a specialist cavity-wall survey with CavClear to investigate whether the wall may be contributing to the problem. A clearer picture of the cause can help you decide what to do next.
Frequently Asked Questions
Can damp travel through an adjoining wall?
Yes, moisture can affect connected masonry if a physical route allows it, but it does not automatically pass between homes just because they share a wall. The route might involve a defect in masonry or a cavity-wall issue. An inspection can consider the wall’s construction and condition to assess whether a pathway is present. Without that evidence, the damp’s position alone cannot establish that moisture came from the adjoining property.
How can I tell whether damp is coming from next door?
You cannot confirm the source from a patch’s appearance or location alone. Note whether it is close to an adjoining wall, whether it changes after wet weather and whether there are visible external conditions worth investigating. These details may help focus an assessment, but they do not prove where the water began. If you’re concerned that your neighbour’s property is causing damp in your home, start by establishing the moisture source.
Can cavity wall insulation cause damp in a neighbouring home?
Defective, damp or unsuitable cavity wall insulation may contribute to moisture problems in some properties, but insulation is not automatically faulty and its presence does not prove it caused damp next door. The wall and cavity need to be inspected to understand their condition and whether a moisture route exists. Cavity wall insulation removal is considered where findings show the insulation is defective, damp or causing issues, not simply because a home has insulation.
What should I photograph if I suspect a damp problem?
Photograph the affected area from a wider view that shows its position in the room, then take a closer image of the mark or mould. Include the date and, if possible, take later photographs from a similar angle so changes are easier to compare. You can also photograph visible external conditions from a place you can access safely. Do not enter another property or disturb plaster, masonry or other building materials to gather evidence.
Can a borescope check inside a cavity wall?
A borescope or endoscope camera can view parts of a cavity through a small opening, helping a specialist examine areas that are not visible from the wall surface. What the camera can show depends on the wall’s construction, access and conditions inside the cavity. It is one investigation tool, not a guarantee that every part of the wall can be viewed. Findings need to be interpreted alongside other inspection evidence.
Does wall-tie corrosion always cause damp?
No. Corroded or deteriorating wall ties do not automatically cause damp, and damp alone does not confirm that ties have corroded. Wall ties connect the inner and outer sections of a cavity wall, so their condition is relevant to the wall’s structural assessment. Cracking or movement can have several causes. A Wall Tie Survey or Cavity Wall Tie Inspection can assess the ties and document their condition rather than relying on surface symptoms.
Will cavity wall insulation removal solve damp in my home?
Not necessarily. Removal may be appropriate if an inspection finds that the insulation is defective, damp or causing issues, but damp can have other causes and additional remedial work may be needed. A survey helps establish whether insulation is relevant before work is considered. The findings should guide the next step for your property, rather than assuming removal will resolve every source of moisture or mould.
How much does a cavity-wall survey cost?
Survey fees vary according to the property and the requirements of the inspection, so there is no single price for every home. Factors can include the property’s construction, access and the scope of the survey. CavClear provides property-specific quotations. A written report can document the inspection findings, include photographs and set out remedial recommendations where required, helping you understand what the survey identified and what steps may be suitable.
Recent Comments